|
The F-14 Tomcat, as we all know, is the US Navy's front line fighter, and is arguably one
of the world's most capable naval aircraft. In addition to the 1/32 Tamiya kit, Revell
also has an offering in 1/32 scale which, despite some criticism over the years, is not a
bad kit, and goes together fairly easily. After having acquired several of these kits over
the years, and the purchase of the Teknics 1/32 Cockpit Detail set, it was off to the
workshop to build this big kit.
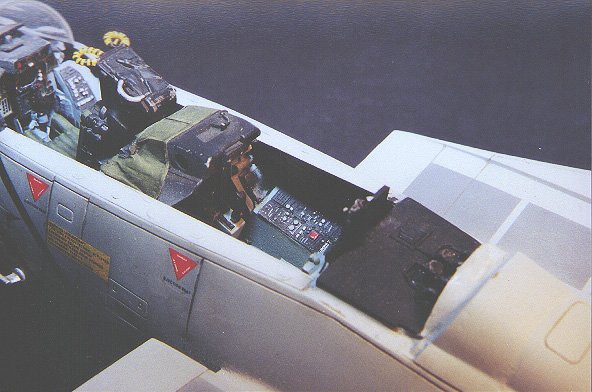
The first thing worth mentioning here is of course, the Teknics set mentioned above. This
set replaces the entire cockpit (minus the seats, although the newer release of this set
includes the GRU-7A seats as well), and is very well detailed. One thing to keep in mind
is that this set is designed to fit in the Tamiya kit. Well, that wasn't going to stop me
from using it in my kit, so I set about to make the set fit into the Revell's forward
fuselage.
I should tell you now that I don't recommend this to anybody. I did manage to get the set
to fit eventually, but not after producing a cloud of resin dust that could have blanketed
the Northeastern United States. I wound up having to grind down a very large portion of
the tub to get it to fit into the kit, and after about a hundred test fits, I was getting
frustrated. I finally wound up having to remove the cockpit flooring underneath the WSO's
seat, and finally, the tub fit into place three hours into the build (whew!).
With this portion of construction completed, I then removed the set again, painted it, and
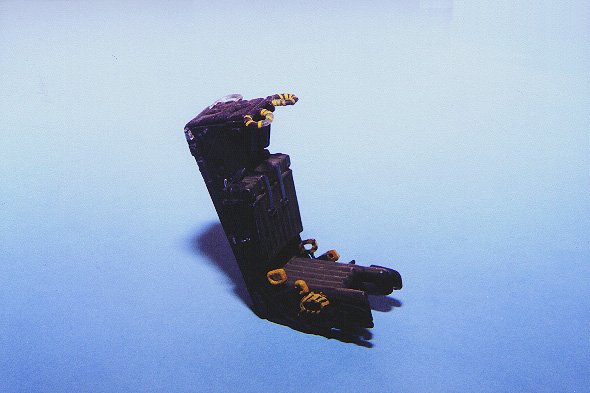
replaced it in the forward fuselage. I also used the kit's seats, which surprisingly
enough, are not that bad. The earlier incarnation of this kit (the one with the rubber
tires), had a pair of seats which were absolutely horrendous, but Revell corrected this in
the later release. The seats were painted with Model Master A/C Interior Black, given a
black wash, and drybrushed. The cushions were painted Olive Drab, and additional detail
such as belts and ejection handles were painted last.
I also used the portion of the Teknics set which is supplied to detail the canopy. This
consists of numerous resin and P/E parts including the canopy frames and locking hooks, as
well as the aft canopy frame. Again, this was far from an exact fit, and a great deal of
tweaking was required to get everything to fit, but the end result was worth it.
The balance of construction was out of the box, and upon completion, the model was
preshaded by spraying the panel lines with MM Europe I Dark Gray. After this dried, a coat
of Light Ghost Gray was applied to the aircraft in various thickness, to simulate the wear
on the actual aircraft's finish, as well as the corrosion control paint applied by Navy
aircrews. I used Superscale's VF-84 markings (which was one of the later schemes worn by
the Jolly Rogers before VF-84 was transferred to the Theodore Roosevelt), as well as
Superscale's F-14 data/stencil sheet, number 32-63. After decal application, the entire
kit was given a final application of Testors Dullcote, and a light dusting of pastels, and
weathering was complete.4156
Although the Revell kit may not be quite as detailed as the Tamiya offering, I found it to
be an enjoyable build, and an economical buy for the price difference of the Tamiya
Tomcat. If I had it to do again (and eventually I will, as I plan to do a hi-viz Jolly
Rogers bird in the near future), I would have saved the Teknics set for the Tamiya kit,
and used the Waldron placard set for the Revell bird. In fact, this will be the subject of
a future article here, so stay tuned.
Steve
Related Links:
Walk Around Photos
|
|